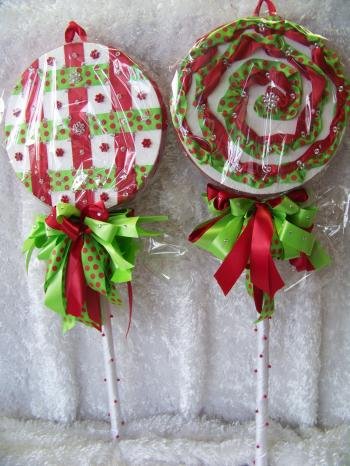
Holiday Lollies
Project created by Cynthia P RossUse this basic formula to design your own Holiday Lollies . The skill level is basic and the fun making them can be with your friends or family. Use you own color schemes to reflect your personal style. Your festive lollies can be whimsical, traditional, glitzy or artsy. These were made from remnants in my scrap box. Anything can be used for adornments, buttons, baubles, beads , glitter etc etc. They can adorn children's trees or be fashioned for an over the top look in shades of black and white with a lot of bling...You are only limited by your imagination in creating your own holiday lollies...Get started and have fun! Ingredients:
- 2 12 by 2 inch Styrofoam discs from Floracraft
- 2 pieces PVC Pipe 3/4 inch by 28 inches long
- 2 bolts (25 yards each color) 1 1/2 inch ribbon
- 7 yards white florist ribbon 2.5 inches wide (to wrap each pipe)
- 2 boxes red corsage pins
- 2 boxes Diamonette pins (If you don't have access to these pins you can use beads from the craft store and use strait pins to secure. It usually takes three to four to secure bead to Styrofoam) *the pins used in this design were from Smithers-Oasis
- 1 roll of clear plastic wrap from a discounter or craft store.
- 2 to 3 Popsicle sticks for each lollipop
- glue (do not use hot glue as it will melt Styrofoam!)
- scotch tape
- wire to make bow for base
- stick on rhinestones (can be found at craft store or Lion Ribbon)
Steps:
- Cut six pieces of 14 to fifteen inch polka dot ribbon and six pieces of red ribbon. You can choose to make both sides or one. I only did one.
- Secure ribbon at top and side of disc with strait pins. Pin one side only. Layer ribbon in a basket pattern to form weave and secure end pieces with strait pins. Repeat on other side if desired...
- Cut another piece of red ribbon approx 26 inches to wrap around face of lollipop. Measure first with your ribbon.
- For the plaid lollipop, fill middle of face with 6 corsage pins to form each pin flower, one in the middle and five around. Repeat the same pattern with five of the Diamonette pins.
- Place additional Diamonette pins in corners for accent.
- Take you PVC pipe and push gently into your Styrofoam about five inches. Make sure it is deep enough into disc to hold lollipop. Remove pipe...
- Tape floral white ribbon to bottom of pipe and begin wrapping tightly up to the point that it enters you lollipop and secure ribbon with clear tape.
- Cut a piece of red ribbon about four inches long for your loop to hang.
- Secure ends of ribbon with about six pins on each side. Remember the heavier your design is, the more pins you may have to use. (this is the red loop that you see at the top of the lollipop)
- Insert additional Diamonette pins around ribbon on face (I used about 12 total)
- Take corsage pins and slide into white ribbon (these are the small dots you see in the picture)
- Remember when wrapping your pipe, to be generous with the amount of ribbon you use to wrap, as this is the base for your corsage pins.
- Now, put glue on the undressed piece of pipe and insert back into disc. Take the Popsicle sticks and slide into hole to help secure your pipe so that it will not come out. Let sit for about twenty minutes to dry (you can prop something under the pipe so that it will not droop while drying)
- Make 2 bows for lollipops , secure with wire and hide mechanics with ribbon. You do not have to embellish both sides (I only did one side of my lollipop)
- You will have to guess on the amount of yardage to make the swirl lollipop. I started with the polka dot and formed a pattern and came behind with red. Use strait pins to hold the ribbon temporarily and embellish with the Diamonette pins when you are satisfied with your design.
- Hang on tree and enjoy!

